
Recipe | Cooking with Macedonian Filo Pastry
Macedonian Filo, Tiropita, Spanikopita and Prasopita
Cheese Filling Tiropita
- 1 container of full-fat ricotta
- 1 cup of good-quality feta
- 2 eggs
- Freshly ground pepper and sea salt to taste
- Beat everything together until combined. Do not worry about lumps
Spinach Filling Spanokopita
This is the same as the cheese filling but add:
- 2 packages of frozen spinach, thawed and squeezed of all excess water
- 2 tbsp of dill olive oil
- 1/2 cup fresh dill, washed and chopped finely
Leek Filling Prasopita
- 3 leeks, washed well and sliced finely
- 1 lean pork chop cut into a very small dice
- 1 cup of feta
- 1 container of full fat ricotta
- 2 eggs
- 1 large tomato, diced
- 2 tbsp extra virgin olive oil
Freshly ground black pepper and sea salt to taste
Heat a frying pan and add olive oil. To this add the pork and stir for five minutes, add the leeks and cook until slightly browned. Now add the tomatoes, salt and pepper, cook for five more minutes of until tomatoes are softened. Place mixture in a bowl and cool. Once cool add remaining ingredients, mix well and set aside.
Roasted Beet Filling Kloropita
The beet filling is again similar to the cheese filling but with a few add-ons.
6 medium beets, washed well
Heat the oven to 375 F.
Roast scrubbed beets in a foil pouch containing 3 tbsp of Wild Anithos Dill extra virgin olive oil and Sicilian Lemon White Balsamic. Cover tightly and place on a baking sheet. Bake for one hour or until easily able to pierce with a knife tip, let beets cool enough to handle and then peel. In a food processor process beets and all the juices from the foil. If necessary add a wee bit more oil and process until fairly smooth. Add remaining ingredients and set aside.
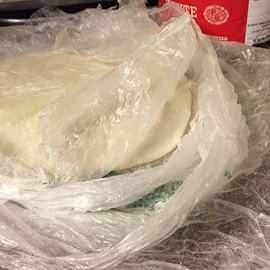
Filo
The filo is a small batch and you may have too much filling if you make all of them. Each batch of filo will use one to two of the fillings.
- 6 cups all-purpose flour
- 3 tbsp extra virgin olive oil
- 1 tsp of dried yeast
- 2 tsp of sea salt
- 2 cups of warm water
On hand you will need a pot of 1 cup of melted salted butter and combined with 1 cup of extra virgin olive oil. This will be the drizzle added between layer and on top of the finished product.
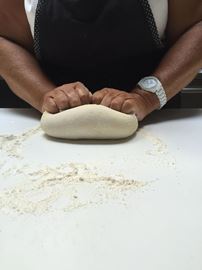
Add all the ingredients to a shallow bowl and bring together kneading for about five minutes or until there is yield and bounce. Divide into four balls and let rest in a lightly oiled bowl, covered in plastic wrap and a cloth for five minutes.
Working with one ball at a time, roll out dough on a lightly floured surface until it is 12 inches in diameter. Do this for each ball layering them in a lightly oiled plastic wrap and covered back in the cloth.
Allow them to rest now for 15 minutes.
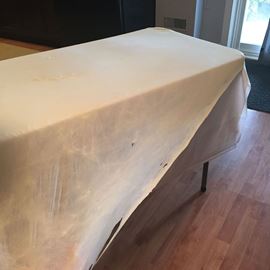
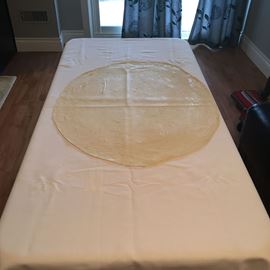
You will need a table that is four-feet long covered in a bedsheet or tablecloth. Take one of the pita rounds in your hands and slowly over clenched fists start to stretch and pull it until it has tripled in size. Place this on the center of the tablecloth and from the edges pull and almost lift it like you were straightening a bedsheet on a bed.
It may rip, but as Vasa kept telling me just “sew it together” give it a little pinch and stitch it back together. Try to get the dough to fall off the table and hang over the edge by a foot.
Each time you do this it becomes easier. You will see an almost thick edge along the end of the dough all the way around. Use a pair of scissors or simply pull it away from the entire circumference. Roll this discarded bit up and place it under the plastic and towel so it doesn’t dry up and it can form another pita for later.
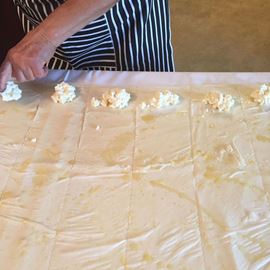
Drizzle the melted butter, oil mixture all over the flat surface, not the sides. Take one side of the dough and the sheet holding it as far apart as your arms can go and flip it halfway to the middle of the table and do the same for the other side.
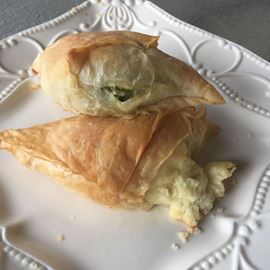
This will not look perfectly even. Vasa’s didn’t and she is an expert, but all will be hidden once you start to roll. With a pizza cutter slice the dough width-wise into two-inch slices. At the bottom of each row add a heaping tablespoon of one of the fillings. We did triangles, which means you take the bottom corner and flip it onto the top of the other side of the dough. Try and make sure each pocket has filling into the corners by pressing it there. If triangles aren’t your thing make mini spring rolls just tuck in the edges once you get started.
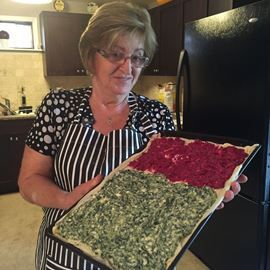
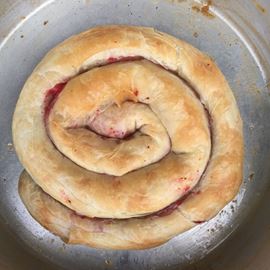
Bourekia is a long snack like roll that you do not cut at all but place little teaspoons of filling lengthwise along the entire dough and then roll like a sausage. Coil this wonderful shape into a big circle.
When the shapes are done place them onto a lightly greased baking sheet. Cover the dough in the butter, oil mixture and let rest for 15 to 30 minutes. It will puff up and swell.
Place the pitas and or bourekia into a 350 F oven for 30 minutes or until golden brown.
Vasa often likes to brush the tops with a little beaten egg yolk and sprinkle of sesame seeds just to make them even prettier.
I know this sounds killer. As I said earlier, try it if you like, but, if you prefer make the fillings and then go to a small Greek pastry shop and get their own homemade dough. It is so much different than the store bought one. It is not nearly as dry and much easier to work with. Make a lot of these because once you and your group get started the going is easy.
Please do let me know your thoughts and check in if I can help in any way. Visit Olivethat.ca for information on Val’s oils and vinegars.